Thursday, March 5, 2009
Return Rights On Used Car
spring in the air, like the color ....
new tutorial this time the protagonists are the flowers of clothing!
very easy and fast ....
if you like ....
begin!
make a string with a strong thread (possibly in the same color ... do not take example from me! Eheheheh)
 and pull the wire to curl ....
passiamo all'altro modello (quello piatto) la filza stavolta sarà effettuata un pò più su...  (piccolo accorgimento....il punto finale di ogni petalo dovrà essere fatto con l'ago nella parte superiore e la stoffa in quella inferiore come nella foto)
 (piccolo accorgimento....il punto finale di ogni petalo dovrà essere fatto con l'ago nella parte superiore e la stoffa in quella inferiore come nella foto)
 fermiamo l'ultimo punto dell'ultimo petalo con un doppio passaggio di ago.... (eviterà che si disfi l'arricciatura) 

uniamo insieme i due capi, con un punto.... dovremmo ora avere la corolla.... 
fissiamo con qualche punto nella parte inferiore....

fissiamo con qualche punto nella parte inferiore....

al centro attacchiamo un bottone abbastanza grosso...
o dei sepali comprati dal fioraio o una pallina di polistirolo rivestita o quello che cavolo volete voi e la vostra fantasia...

ed ecco qui il nostri bei fiorellini....
super carini! 


If you have no idea how to use them .... the next tutorial I'm ready .... will enlighten you! : O)  Meanwhile, prepare the flowers! The rest we'll see ....
 Meanwhile, prepare the flowers! The rest we'll see ....
ps if you liked the tutorial,
 if you liked the tutorial ... if you are not interested in the spring ....
 if you love the spring ....
.....( if you add whatever you want you ....) anyway .....

che ne dite di darmi una mano a far conoscere il blog?
basta un voto e 10 secondi del vostro tempo!
:o)
grazie! 
Friday, February 20, 2009
Cervical Cancer Flow Diagram
B from ... muffin

choose fabrics that are tuned to a harmonious relationship between their colors, I recommend using the
cotton fabrics, are more manageable
especially for those just beginning.

dub straight against
with a pen evanescent (ie those that would discolour after a while
without a trace) or with a dressmaker's chalk mark the boundary of the model.
 little trick: use a pin "open" this type of photo,
supplied with most of the sewing machines, as it gives us a better view of where we are sewing

go only to sew the top edge (the wave) of our model
being careful to follow the sign to perfection! Otherwise waves goodbye! 
cut the excess fabric leaving just half around cm (tip to cut the fabric after sewing
this allows turning the model with no unsightly wrinkles. 
toss and turn from the straight and stretch her going ....

now move on to sew the side of our muffin

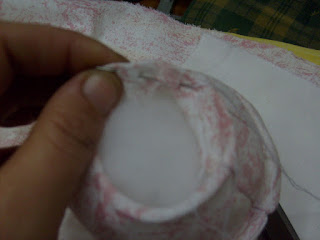
we should at this point, sew the bottom of the muffin,
please carefully follow the next steps, are important not only for the muffin in question, but all the things we're going to sew and have spherical bases  if we performed well this, we have neither wrinkles nor
excess softness of fabric .... have two pieces fitted together perfectly, 


folded to the inside edge of the muffin
(this will avoid having wires dangling disgusting)
e facciamo una filza con un filo abbastanza resistente
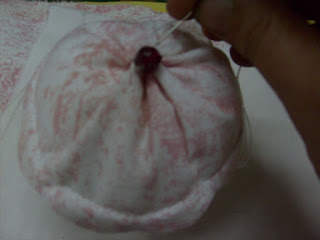
 tiriamo con delicatezza distribuendo bene il riccetto che si andrà via via formando
ATTENZIONE
se questa operazione non viene fatta bene,
il vostro muffin risulterà storto e in bilico
:o) 
fissiamo con qualche punto la chiusura

e dulcis in fundo...
la ciliegina sulla torta!
anzi sul muffin!!!!

mi sono stati richiesti alcuni tutorial via mail che non pensavo di fare,
poichè li ritenevo troppo facili,
ma la risposta di una ragazza mi ha lasciata senza parole:
facili per chi? per te che sai come si fanno!
e allora eccomi qui a postare un passo a passo
che avevo escluso in principio,
e a torto devo dire...mi sono proprio divertita a farlo
(un doveroso ringraziamento the "photographer" exceptional
who forgot to remove your finger from the flash while taking a picture! ) : o)
So, no more diets today .... muffins! poichè li ritenevo troppo facili,
ma la risposta di una ragazza mi ha lasciata senza parole:
facili per chi? per te che sai come si fanno!
e allora eccomi qui a postare un passo a passo
che avevo escluso in principio,
e a torto devo dire...mi sono proprio divertita a farlo
(un doveroso ringraziamento the "photographer" exceptional
who forgot to remove your finger from the flash while taking a picture! ) : o)
choose fabrics that are tuned to a harmonious relationship between their colors, I recommend using the
cotton fabrics, are more manageable
especially for those just beginning.
dub straight against
with a pen evanescent (ie those that would discolour after a while
without a trace) or with a dressmaker's chalk mark the boundary of the model.
 little trick: use a pin "open" this type of photo,
 supplied with most of the sewing machines, as it gives us a better view of where we are sewing

go only to sew the top edge (the wave) of our model
being careful to follow the sign to perfection! Otherwise waves goodbye!

cut the excess fabric leaving just half around
to avoid inconvenience to both beginners and the expert in a hurry!) 
hours with the tip of the scissors touched all corners of intersections, 
this allows turning the model with no unsightly wrinkles.

toss and turn from the straight and stretch her going ....

now move on to sew the side of our muffin

we should at this point, sew the bottom of the muffin,
please carefully follow the next steps, are important not only for the muffin in question, but
bent a little towards the outside edge on which we should sew the circular piece  well as in photo
 well as in photo
  all around by sliding out as you go
  if we performed well this, we have neither wrinkles nor
 excess softness of fabric .... have two pieces fitted together perfectly,
cuciamoli to take the next step 
straight toss and turn from our artwork
: o)

straight toss and turn from our artwork
: o)

roll up the top into the lower as shown in the picture below ... this will enable us more easily in a seam the next step. 
we place the inside of the leg in order to distance 
and begin to make a seam all around the edge. so we will have our dear Ondine: o) 
at this point, fill with stuffing our muffins, give a consistency not too hard (too much padding) nor too loose (too little! Not be rancine!) 


folded to the inside edge of the muffin
(this will avoid having wires dangling disgusting)
e facciamo una filza con un filo abbastanza resistente
 tiriamo con delicatezza distribuendo bene il riccetto che si andrà via via formando
 ATTENZIONE
se questa operazione non viene fatta bene,
il vostro muffin risulterà storto e in bilico
:o)

fissiamo con qualche punto la chiusura

e dulcis in fundo...
la ciliegina sulla torta!
anzi sul muffin!!!!

Easy!  bon appetit .....
 bon appetit .....

Thursday, February 19, 2009
Sotalol More Drug_side_effects
tutorial
 posizioniamolo esattamente sopra l'altro che abbiamo già cucito. pieghiamo ora a metà la base (35 x 50) right against right
sew on both sides, being careful to take all layers of fabric with the seam, if you are inexperienced help you with a basting.
once sewed the two sides, open corners with the seam in the center front and a seam pass (This section is intended to give the thickness)

half-fold the other piece of cloth 35 x 50 and sewing the sides,  pieghiamo i bordi all'interno facendoli combaciare...
 a questo punto dovremmo avere una cosa del genere... :oD
se si presenta così anche la vostra possiamo proseguire....
 ultimo passo la chiusura... io odio le hinges, so I used velcro to close the
but if you like it .... you can change the zip!
then cut a piece of Velcro 34 cm (above and below)
and hook up with a seam part of the velcro to one side .... 
and the other party on the other side .....


Hi all, as announced a new public tutorial .... late immense
the blame for this delay is due not to the undersigned, who also worked
and taking pictures already last week, but the platform blogger, that seems to have tired of posting photos and ... did strike! I am damned soul to do this post for the entire week,
least I hope it's worth the wait and I am presenting the creation you enjoy ....
this is the clutch that we will achieve ....
(the picture scared I know, but realize it is really super easy)
start?
This clutch requires two pieces of cloth 35 x 50 cm (pouch) the blame for this delay is due not to the undersigned, who also worked
and taking pictures already last week, but the platform blogger,
that seems to have tired of posting photos and ... did strike! I am damned soul to do this post for the entire week, least I hope it's worth the wait and I am presenting the creation you enjoy ....
this is the clutch that we will achieve ....
(the picture scared I know, but realize it is really super easy)
start?
take the stuff that we like and that is fairly consistent (if you like instead to use a lightweight cotton stretch just on the back of each piece a bit of adhesive dressing table!)
1 piece 35 x 40 cm (inner liner)  ed un pezzo di stoffa in fantasia diversa sempre di 35 x 40 cm (tasche interne)
(queste misure possono variare a seconda del vostro gusto!) :o) stiriamo a metà il pezzo 35 x 40 in fantasia diversa
e posizioniamolo a metà della stoffa base (35 x 50) facendo attenzione che i bordi vivi
siano posizionati al centro.
facciamo una cucitura al centro della striscia in senso verticale.
stiriamo a metà anche l'altro pezzo di stoffa 35 x 40
e posizioniamolo a metà della stoffa base (35 x 50) facendo attenzione che i bordi vivi
siano posizionati al centro.
facciamo una cucitura al centro della striscia in senso verticale.
stiriamo a metà anche l'altro pezzo di stoffa 35 x 40
 posizioniamolo esattamente sopra l'altro che abbiamo già cucito. pieghiamo ora a metà la base (35 x 50) right against right
 sew on both sides, being careful to take all layers of fabric with the seam, if you are inexperienced
 help you with a basting.
 once sewed the two sides, open corners with the seam in the center front and a seam pass
 (This section is intended to give the thickness)
for this piece and also "smooth" corners 
 :o) a questo punto avremo due quasi-pochette
che andremo ad infilare una nell'altra rovescio contro rovescio,

 :o) a questo punto avremo due quasi-pochette
 che andremo ad infilare una nell'altra rovescio contro rovescio,
 pieghiamo i bordi all'interno facendoli combaciare...
 a questo punto dovremmo avere una cosa del genere... :oD
 se si presenta così anche la vostra possiamo proseguire....
 ultimo passo la chiusura... io odio le hinges, so I used velcro to close the
 but if you like it .... you can change the zip!
then cut a piece of Velcro 34 cm (above and below)
and hook up with a seam part of the velcro to one side ....

and the other party on the other side .....
and here it is our masterpiece!! : o) 

and this is done ..... 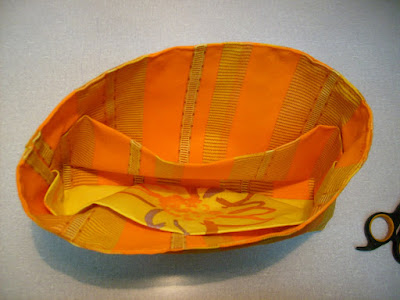 Message for Anna:
I received your mail, but I can not answer you.
I am preparing the tutorial that interests you,
and will be online soon .... allowing bloggers ...
: o (
kisses kisses
 Message for Anna:
 I received your mail, but I can not answer you.
I am preparing the tutorial that interests you,
and will be online soon .... allowing bloggers ...
: o (
kisses kisses


Subscribe to:
Comments (Atom)